Monday, March 25, 2024

Raspberry Pi : Serial Console Server with ser2net

Configuration the console server

1. Update your Pi and install ser2net
#sudo apt update
#sudo apt upgrade -y
#sudo apt install ser2net -y
 

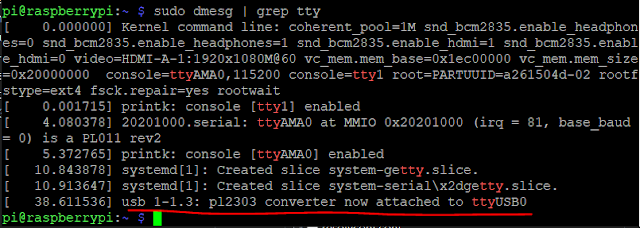
2. Find the serial adapters are listening on what port
#dmesg | grep tty

3. Configuration ser2net


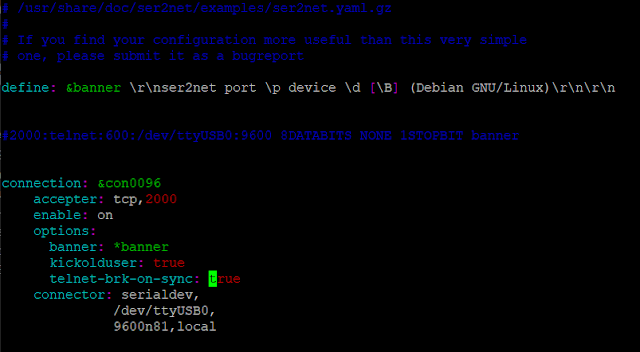
#sudo nano /etc/ser2net.yaml

define: &banner \r\nser2net port \p device \d [\B] (Debian GNU/Linux)\r\n\r\n

connection: &con0096
    accepter: tcp,2000
    enable: on
    options:
      banner: *banner
      kickolduser: true
      telnet-brk-on-sync: true
    connector: serialdev,
              /dev/ttyUSB0,
              9600n81,local


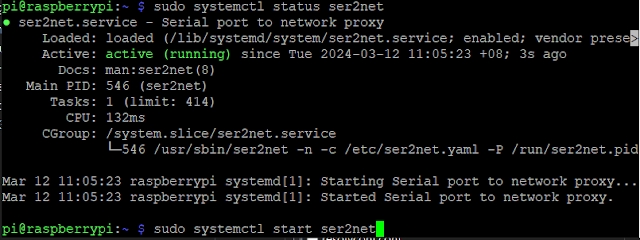
#sudo systemctl start ser2net
#sudo systemctl status ser2net


How to used the console server

1. Make sure the console server USB serial cable is connected to switch or any related device
2. Service ser2net is started. Noted the console server IP address
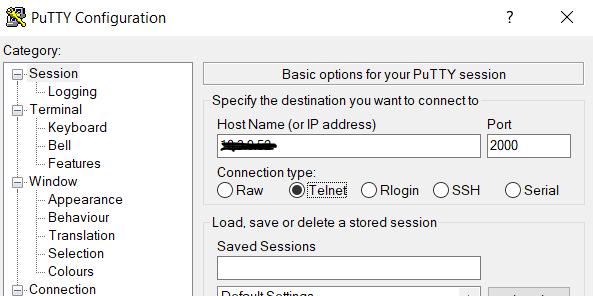
3. Open the telnet or ssh - Putty to telnet the console server


4. In Host-address : <console server IP> : port : <refer to the port setting in configuration>
5. Console to switch is open and now can do switch configuration

source : https://www.jpaul.me/2019/01/how-to-build-a-raspberry-pi-serial-console-server-with-ser2net/
Friday, January 5, 2024

H3C/Comware Switch : Configure HOSTNAME, VLAN, IP and TRUNK

1.Configure the host name

<switch>system-view
[switch]sysname H3C 

2.Create VLAN

<switch>system-view
[switch]vlan 100

3.Delete VLAN

<switch>system-view
[switch]undo vlan 100

4.Add IP to VLAN Interface for management

<switch>system-view
[switch]interface Vlan-interface 100
[switch-Vlan-interface100]ip address 192.168.0.100 255.255.255.0
[switch-Vlan-interface100]display interface Vlan-interface100

Vlan-interface100 current state: UP
Line protocol current state: UP
Description: Vlan-interface100 Interface
The Maximum Transmit Unit is 1500
Internet Address is 192.168.0.100/24 Primary
IP Packet Frame Type: PKTFMT_ETHNT_2,  Hardware Address: 3ce5-a64f-8fc0
IPv6 Packet Frame Type: PKTFMT_ETHNT_2,  Hardware Address: 3ce5-a64f-8fc0

5.Configure the switch gateway address

<switch>system-view
[switch]ip route-static 0.0.0.00.0.0.0 192.168.0.1

6.VLAN Status

<switch>display vlan100
VLAN ID: 100

VLAN Type: static
Route Interface: configured
IP Address: 192.168.0.100
Subnet Mask: 255.255.255.0
Description: VLAN 00100
Name: VLAN 00100
Tagged   Ports: none
Untagged Ports:
    GigabitEthernet1/0/23
    GigabitEthernet1/0/24 

7.Change Port type (Access/Trunk/Hybrid)

<switch>system-view
[switch]interface GigabitEthernet 1/0/1
[switch-GigabitEthernet1/0/1]port link-type access

8.Add the port to VLAN 100

<switch>system-view
[switch] interface GigabitEthernet 1/0/24
[switch] port access vlan 100

9.Set the default VLAN for the trunk port

<switch>system-view
[switch]interface GigabitEthernet 1/0/24
[switch-GigabitEthernet1/0/24]port trunk pvid vlan 100

10.Allow the specified VLAN to pass through the current Trunk port

<switch>system-view
[switch]interface GigabitEthernet 1/0/24
[switch-GigabitEthernet1/0/24]port trunk permit vlan {list|all}

11.View port status

<switch>system-view
[switch] display interface GigabitEthernet1/0/24

12.Enable/Disable the port

<switch>system-view
[switch] interface GigabitEthernet 1/0/24
[switch] undo shutdown
[switch] shutdown

13.View current configuration

<switch>system-view
[switch] display current-configuration

14.Save the switch configuration
<switch>system-view
[switch] save

15.View saved configuration

<switch>system-view
[switch] display saved-configuration

Source : 

Wednesday, November 29, 2023

Prometheus and Grafana : Monitor BIND DNS server

 1.Pre-requisites
- BIND need to have been build with libxml2 support
# named -V | grep libxml2

2.Installed Bind Prometheus Exporter
-
Download the latest release of bind_exporter binary:

# curl -s https://api.github.com/repos/prometheus-community/bind_exporter/releases/latest | grep browser_download_url | grep linux-amd64 |  cut -d '"' -f 4 | wget -qi -
# tar xvf bind_exporter*.tar.gz
# sudo mv bind_exporter-*/bind_exporter /usr/local/bin
# bind_exporter --version

3. Configure BIND to open a statistics channel
- Edit the file /etc/named.conf to add

statistics-channels {
  inet 127.0.0.1 port 8053 allow { 127.0.0.1; };
};

4.Create Bind Exporter systemd service
- Add Prometheus system user account:
#sudo groupadd --system prometheus
#sudo useradd -s /sbin/nologin --system -g prometheus prometheus

- Create a systemd service unit file:
sudo tee /etc/systemd/system/bind_exporter.service<<EOF
[Unit]
Description=Prometheus
Documentation=https://github.com/digitalocean/bind_exporter
Wants=network-online.target
After=network-online.target

[Service]
Type=simple
User=prometheus
Group=prometheus
ExecReload=/bin/kill -HUP \$MAINPID
ExecStart=/usr/local/bin/bind_exporter \
  --bind.pid-file=/var/run/named/named.pid \
  --bind.timeout=20s \
  --web.listen-address=0.0.0.0:9153 \
  --web.telemetry-path=/metrics \
  --bind.stats-url=http://localhost:8053/ \
  --bind.stats-groups=server,view,tasks

SyslogIdentifier=prometheus
Restart=always

[Install]
WantedBy=multi-user.target
EOF

- Reload systemd and start bind_exporter service
#sudo systemctl daemon-reload
#sudo systemctl restart bind_exporter.service

- Enable the service to start on boot:
#sudo systemctl enable bind_exporter.service

- Open the port on the firewall
#sudo firewall-cmd --add-port=9153/tcp --permanent
#sudo firewall-cmd --reload

5.Configure Prometheus Server
- Edit file prometheus.yml
#sudo vi /etc/prometheus/prometheus.yml

- Add the jobs definition

- job_name: dns-master
    static_configs:
      - targets: ['10.1.5.3:9153']
        labels:
          alias: dns-master

  - job_name: dns-slave1
    static_configs:
      - targets: ['10.1.5.4:9153']
        labels:
          alias: dns-slave

#sudo systemctl restart prometheus

6. Add Grafana Dashboard
- Use already created Grafana dashboard ID is 1666
- Import Bind Grafana Dashboard by navigating to Dashboard > Import

source : https://computingforgeeks.com/monitor-bind-dns-server-with-prometheus-grafana/?expand_article=1

Monday, November 6, 2023

Virtualmin : CLI Backup and Restore

Backup
#virtualmin backup-domain --source /home/xxx.tar.gz --all-domains --all-features

Restore
#virtualmin restore-domain --source /home/xxx.tar.gz --all-domains --all-features

Transfer/Replication
#virtualmin transfer-domain --domain xxx.com --host hostname --pass 1234 --replication --output --overwrite


*Issue GPG Failed
#sudo sh -c "$(curl -fsSL https://software.virtualmin.com/gpl/scripts/virtualmin-install.sh)" -- --setup

Friday, October 20, 2023

Ubuntu : Static IP Ubuntu 22.04

Disable Cloud
#sudo vi /etc/cloud/cloud.cfg.d/99-disable-network-config.cfg 
network: {config: disabled}
 
Config static IP 

#sudo vi /etc/netplan/xxxx.yaml

network:
  ethernets:
    ens160:
      addresses: [192.168.0.7/24]
      routes:
        - to: default
          via: 192.168.0.253
          metric: 100
      nameservers:
          addresses: [8.8.8.8,8.8.4.4]
          search: [malayahost.com]
      dhcp4: false
  version: 2

Apply config
#sudo netplan apply
#ip add show
#ip route show 


Monday, October 9, 2023

Friday, May 12, 2023

Ubuntu : Extending LVM Volume

1. Check for free space by running. #cfdisk

  • see if there is free space listed, can proceed to step 2
  • if don’t see free space listed, initiate a rescan of /dev/sda
  • #echo 1>/sys/class/block/sda/device/rescan
  • once done, re-run #cfdisk 

2. Select which partition to extending. Example - /dev/sda3 partition from the list and then select “Resize

3. ENTER and it will prompt to confirm the new size. Now /dev/sda3 partition with a new larger size.

4. LVM partition backing the  /dev/sda3 Physical Volume (PV) has been extended. Then need to extend PV

  • #pvresize /dev/sda3 -> 
  • #pvdisplay - to check the new size
  • #vgdisplay - check the Volume Group (VG) free space
  • #lvdisplay - check the size of our upstream Logical Volume (LV)
  • #lvextend -l +100%FREE /dev/ubuntu-vg/ubuntu-lv
  • #df -h - check current size of the file system
  • #resize2fs /dev/mapper/ubuntu--vg-ubuntu--lv 
  • (centos) #xfs_growfs /dev/mapper/xxxx/xxxx


 Source : https://packetpushers.net/ubuntu-extend-your-default-lvm-space/ 

Friday, April 7, 2023

Microsoft : Change Remote Desktop port

 The step

  1. Start the registry editor. (Type regedit in the Search box.)
  2. Navigate to the following registry subkey: HKEY_LOCAL_MACHINE\System\CurrentControlSet\Control\Terminal Server\WinStations\RDP-Tcp
  3. Find PortNumber
  4. Click Edit > Modify, and then click Decimal.
  5. Type the new port number, and then click OK.
  6. Close the registry editor, and restart your computer.


Check the current port by running the following PowerShell command:

Get-ItemProperty -Path 'HKLM:\SYSTEM\CurrentControlSet\Control\Terminal Server\WinStations\RDP-Tcp' -name "PortNumber"


To add a new RDP Port to the registry:

$portvalue = 3390

Set-ItemProperty -Path 'HKLM:\SYSTEM\CurrentControlSet\Control\Terminal Server\WinStations\RDP-Tcp' -name "PortNumber" -Value $portvalue

New-NetFirewallRule -DisplayName 'RDPPORTLatest-TCP-In' -Profile 'Public' -Direction Inbound -Action Allow -Protocol TCP -LocalPort $portvalue
New-NetFirewallRule -DisplayName 'RDPPORTLatest-UDP-In' -Profile 'Public' -Direction Inbound -Action Allow -Protocol UDP -LocalPort $portvalue 


Source : https://learn.microsoft.com/en-us/windows-server/remote/remote-desktop-services/clients/change-listening-port

Tuesday, March 28, 2023

Note : The list required to install and configure

 Checklist to activate hosting server (php, laravel and sql server)

  1. Install Virtualmin
  2. Upgrade PHP8.1 or latest
  3. To connect with Oracle DB - install OCI8
  4. To connect with MSSQL - install ODBC, sqlsrv, pdo_sqlsrv
  5. Install Laravel - install composer, npm, node

# Previous OS Centos 7 and below - install with latest OpenSSL 1.0.2k-fips
# Latest OS Rocky9.1 and above - install with latest OpenSSL 3.0

Monday, March 27, 2023

OpenSSL : Install and Upgrade version

1.Verify the current OpenSSL version

# openssl version

2. Download the latest version OR previous version of OpenSSL

# cd /usr/local/src
# wget https://www.openssl.org/source/openssl-X.X.X.tar.gz
# tar -xvzf openssl-X.X.X.tar.gz

3.Manually compile and install OpenSSL

# cd openssl-1.0.2l
#./config
# make depend
# make
# make test
# make install

4.Move the newly installed OpenSSL binary to the PATH

# mv /usr/bin/openssl /root/
# ln -s /usr/local/ssl/bin/openssl /usr/bin/openssl

5.Verify the newly installed OpenSSL version

#openssl version


source